Category Archives: Tools

Markdown with Latex

Published / by Andrew

I heart Latex, but I don’t really write with it these days since I’m no longer in grad school. Markdown, though, I use all the time. So, on the occasions that I need to use math in my markdown file, I like to be able to have a math mode that’s identical to Latex’s math mode.

Turns out, when I’m converting from markdown to HTML in Pandoc, I really only need to add one option to it– --mathml. There’s also an option for MathJax, but I’m not quite as fond of that because I need to specify the source file and it also means adding JavaScript to the HTML output.

So, pandoc --mathml myfile.markdown -o myfile.html will convert my file to HTML with Latex math support. $$ is the delimiter for math mode and $ is the delimiter for inline math mode. Pretty simple.

Of course, it’s not nearly as robust as a proper Latex setup, but if I need something more powerful than what’s available, I’ll probably just switch over from markdown to Latex.

Update: I also don’t like the block equations in the middle of the page (I don’t like that with Latex proper, either), so I put some css directly into the markdown file at the very top:

<style>math[display="block"] {display:block;padding-left:4em;} </style>

So, you accidentally dropped a Git stash.

Published / by Andrew

(Note: The information from this post comes from this SO question. I’m just collecting what I found to be the best parts of it.)

(Note 2: I’m using Linux with Bash, and the commands here probably won’t work in Windows. They may work in MacOS, though.)

They say that coding is 99% boredom and 1% pure terror.

I experienced that terror today when I had meant to type git stash pop, but accidentally typed git stash drop.

It turns out that the solution is much easier than you might expect, though finding it was a minor challenge. Upon dropping a stash, Git does not delete the information in the stash– It looks like it just deletes the reference. If you can find the hash, you’ll be able to still restore the stash.

If you only just now dropped the stash and still have the hash listed on your screen, skip ahead to the section involving actually applying the stash (just one command). Otherwise,

Finding the hash that matches the stash.

If, like me, you already tried some commands and no longer have the hash on the screen, the first thing you’ll need to do is figure out which hash is the one from the dropped stash.

The first thing you’ll want to do is echo out a whole bunch of information from git diff. You can echo it into a file (which is what the link above does) or you can pipe it into less, which is what I’ll do here–

git show $( git fsck --no-reflog | awk '/dangling commit/ {print $3}' ) | less

At this point, you’ll need to know something unique (or nearly unique) about your particular stash that you can search, and you’ll need to be able to recognize the changes well enough to identity which stash you need. Something unique like this could be the name of the stash, if you remember it and it’s unique, or the date (in format Fri Jun 28 15:09:54 2019 -0400), or maybe a function name that you wrote. Just anything that you can use to search via less to find the stash you need.

To search with less open, press the / key, and remember that search is case-sensitive. In my case, I had written a function that I distinctly remember writing, radval. (Also note that to move to the next match in a search, hit n, to go to the previous search, hit Shift+n. Scroll with arrow keys, but look up more details for less if it’s a program you plan to use a lot, as I do.)

Once you find some code that you know is in the stash you need (or just found the title or something), scroll up, if needed, to the heading of the stash. This will be four lines starting with “commit”, “Merge”, “Author”, and “Date”. The long alphanumeric string following “commit” is the hash, and it’s what you’ll need.

The hard part is done.

Applying the orphan stash.

This part is easy. If you have the stash hash, and for this example I’ll use 73d46febad13327963c7e0bf95ce2829fe35042d, simply put this in the command prompt–

git stash apply 73d46febad13327963c7e0bf95ce2829fe35042d

It should be done now, so you can breath out.

Some helpful VirtualBox command-line reference.

Published / by Andrew

A little bit of background for this post.

I love VirtualBox. Though, to be more specific, I love having a virtual machine to use for testing. Discovering bridged ip addresses was a revelation for me.

But I also love ssh. I regularly ssh from my laptop in my living room to my desktop in my office because I’m too lazy to get up. So, I want to be able to set up virtual machines via ssh.

Docker is pretty neat, but it’s not really designed for what I want it to do. I tried it, and decided it wasn’t really worth fidgeting with it to set up a bridged IP address, which I’m not 100% sure is possible in a Docker container anyway. I used Vagrant from Hashicorp for awhile, which is pretty good, but I’ve encountered a versioning problem– My version of VirtualBox was too new for my version of Vagrant, so it wouldn’t start. So, why not cut out the middleman and just manage VirtualBox via CLI? The only feature from Vagrant I really care about is starting a VM, anyway.

I thought it would be difficult, but it’s actually surpisingly easy. To do this, you’ll need install VirtualBox extensions from their website. Make sure to get the extentions for the right version of Virtualbox– If you’re installing VBox from a repo, it’s probably in the “VirtualBox older builds” page. Also, I’m not bothering with actually creating virtual machines via CLI from scratch, but instead making a base VM to copy when needed. Creating from scratch, I don’t think, can be done via CLI, though I could be wrong about that. So, I created a base VM while physically at the host machine, and can now clone that machine, and can now create a new test server via CLI.

And these are the commands that I use to manage them, in no particular order. “Ubuntu Server” is just an example name, matching whatever the name is that you’ll see when you open the VirtualBox Manager.

IP addresses:
It doesn’t seem to be possible to get a VM’s ip address using VBoxManage if they’re a bridged adapter. (The listed solutions online don’t work.) The best I can find is “nmap -sP 192.168.1.*”, which will list all IP addresses on the network. If it’s run both before and after the VM is started, the IP should be found.

List all VMs:
VBoxManage list vms

List all running VMs:
VBoxManage list runningvms

Start VM:
VBoxManage startvm "Ubuntu Server" --type headless

Pause VM:
VBoxManage controlvm "Ubuntu Server" pause --type headless

Restart paused VM:
VBoxManage controlvm "Ubuntu Server" resume --type headless

Shut down VM:
VBoxManage controlvm "Ubuntu Server" poweroff --type headless

Change network adaptor to bridged:
VBoxManage modifyvm "Ubuntu Server" --nic1 bridged

Clone vm:
VBoxManage clonevm "Ubuntu Server" --name "New Ubuntu Server" --register

  • If forget the “register” option, the “registervm” command is supposed to fix that, but I can’t get it to work. In that case, best to start over and delete the newly-created folder in ~/VirtualBox\ VMs
  • If forget the “name” option, it will just have the old name plus “clone”.

Delete vm:
VBoxManage unregistervm "Ubuntu Server" --delete

Reducing size of video files via CLI.

Published / by Andrew

(TL;DR: Conversion script is at the end of this post.)

When it comes to video entertainment, I much prefer local media to streaming services, because I like being able to manage as much as I can using Kodi. (I used to use Kodi with an Android TV box, but now I have a laptop hooked up to my TV, but that’s a story for another day.)

But, using local media presents a problem– Space management. Unless I want to keep getting more and bigger hard drives (and I don’t), I have to figure out how to shrink down the video files without losing so much quality that I render them unwatchable. I also want to make these conversions via CLI so that I can do it over SSH.

I developed a small script that converts all files in a directory (not recursively, just because I didn’t want to do it that way) into smaller files. It uses BASH (with which I have a love/hate relationship) and FFMPEG (with which I have a hate/hate relationship). This changes the constant rate factor, changes the video and audio codecs, and reduces the resolution to 540×360 for widescreen and 540xWhatever for 4:3 (too lazy to math right now). I also toyed with changing the framerate, but reducing that made a pretty small change in filesize with a big change in video quality, though it may be worth it if you have a 60fps video.

As it currently stands, this reduces filesize by half for my current files, but that will depend on the source files.

This uses the version of FFMPEG that comes with Ubuntu 16.04 (I haven’t upgraded to 18.04 yet).

Some useful commands when checking the results are:

du -sh filepath     # Shows amount of space a directory or file
mediainfo filepath  # Shows information about a media file, but requires
                    # installing mediainfo from repos.

I’d kind of like to source where I found all of this information, but the script below is a Frankenstein’s monster using organs scattered all across the web.

You’ll want to update the inputDir and newDir variables whenever you run this, or you can modify to use ${1} and ${2}, which I may do for myself in the near future. You do not need to escape spaces, though. (And be aware that this will take awhile if you’re running it on a large directory.) You’ll also want to put this script one directory above the directory that you want to convert, and make an empty directory for the target directory.

inputDir="Jontron"
newDir="Jontron Reduced" # Make sure this exists in the same directory as inputDir.

cd "${inputDir}"

shopt -s globstar # I have no idea what this does, but the script doesn't work if it's not run.

for file in **/*; do
    ffmpeg -i "$file" -c:v libx264 -crf 24 -b:v 1M -c:a aac -filter:v scale=540:-1 ../"${newDir}"/"${file}"
done;

MondoNotes

Published / by Andrew

I’ve recently launched my latest project, MondoNotes.com.

MondoNotes is a task manager (as in, to-do list) and note-taker, but works differently from most task managers. At its core, MondoNotes is nothing more than a syntax-highlighter, changing colors based on whether you’re marking something as “todo” or “done,” or “information.” This is simple, but allows much more detailed projects and is far more intuitive than any task manager that I’ve used before. The syntax highlighting really helps to scan through the existing notes.

I’ve used this method for several years and slowly developed different features, but, until recently, I had only used a vim syntax file. MondoNotes is more accessible to non-Vim users, and has the advantage of being “in the cloud”, so I don’t have to worry about syncing files or downloading anything.

A video introducing Mondonotes can also be found here.

If you’re reading this, I hope you’re interested enough to give it a try. To say that this methodology has saved my skin and made projects much easier to manage would be an understatement. Thanks for reading!

Andrew’s Simple PHP Router

Published / by Andrew

A little while ago, I created a routing tool in PHP for a small website that I made. Essentially, it handles routing with as little as necessary to jumpstart MVC coding as closely to vanilla PHP as possible.

I created this because I felt like the MVC frameworks I’ve come across were far more complicated than necessary for small projects, and sometimes even for large projects.

Andrew’s Simple PHP Router

Vim Overriding Settings Woes

Published / by Andrew

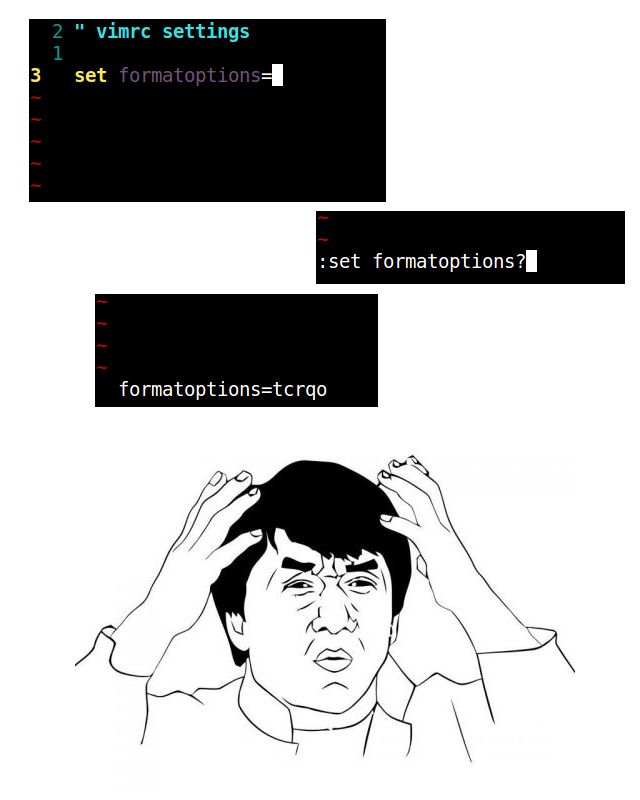
Probably every good program has a few irritating anti-features. One of Vim’s aggravating quirks is that it loads plugins after vimrc, which means that some of those plugins may or may not override some settings. (The most frustrating one for me is that I like to have formatoptions set to nothing, but many plugin devs have decided that they know my typing habits better than I do.)

Customizability is extremely important to me, and these plugins really begin to wreak havoc on my workflow.

Probably the best thing to do would be to track those plugins down and edit them manually. Whenever you find a setting that’s being overridden, in this example we’ll use formatoptions, run :verbose set formatoptions?. This will tell you what offending script set it.

Unfortunately, this will likely only be an option if you have root access, because the plugins are in /usr/share/vim/vimXX/* (where “XX” is the Vim version). I have this problem in Termux’s default Vim installation, but that’s resolvable because I have root access to edit these files. However, I’m currently in a situation with a client in which I don’t have root access.

There is a good workaround that I found online, but it’s not perfect. Unfortunately, the website has been down since before I even found the site, but the search results looked promising enough that I checked Google’s cache, and it revealed a pretty good solution. Kind of an obvious solution, but a good one nonetheless.

The direct link is here, but, as I write this, I haven’t been able to reach it (including while using a proxy server).

At any rate, since I don’t know how long Google keeps their cache up, I thought I’d go ahead and duplicate it here (with a few minor changes), in case the website is gone for good.

What we need to do is take advantage of Vim’s “after” functionality, so it will reload $HOME/.vimrc after every plugin is loaded. (You may have some luck with $MYVIMRC, but I’ve found that there are many cases in which $MYVIMRC isn’t even set.) There’s a simple BASH script to do this, and it’s so short that I usually just type it directly into the terminal instead of making an individual script file.

(TL;DR version: Start here)

Please note that there’s a good chance that you’ll need to change the directory path from /usr/share/vim/vim74 to something else. It was only recently that Vim updated to 8.0, and a lot of systems (mine included) don’t use it, and some are still on 7.1. You’ll just need to figure out what directory to use.

    mkdir -p ~/.vim/after/ftplugin
    rm -i ~/.vim/after/ftplugin/*
    for file in /usr/share/vim/vim74/ftplugin/*.vim; do
        ln -s ~/.vimrc-after ~/.vim/after/ftplugin/`basename $file`
    done

Now, Vim will automatically load whatever’s in $HOME/.vimrc-after after loading any plugin. I just put source $HOME/.vimrc in mine. This means it’ll resource my vimrc every time it loads a plugin.

This is not ideal because it means resourcing a settings file every time you open a new file, but, from a pragmatic standpoint, it helps a whole lot more than it hurts.

FastMail Programming Woes

Published / by Andrew

I went through a headache today when I discovered that emails were no longer being sent from Threadstr. I couldn’t figure out what had changed because I haven’t actually touched it in quite awhile. Both my local development and threadstr.com had stopped working and with the same error message: “Error: Invalid login: 535 5.7.0 Incorrect username or password.” I had changed no settings since the last time it was working on either, I had made no changes to the domain registration, and the username and password were correct.

Well, it turns out that something changed on FastMail’s side. I’m not exactly sure specifically what they did, but they no longer let you programmatically send mail using the same password that you use to log in to the frontpage. You now need to create a new password specifically for your application.

It’s actually a good idea, but I sure wish they had let me know about this before they implemented it, because it completely broke Threadstr functionality. I can’t even find an announcement for it– I had to dig through the settings in a wild madcap adventure to find something, anything that could have caused the service to suddenly stop working.

(Irritated as I am, I’m making no plans to change to another email provider, because they’ve still been great so far.)

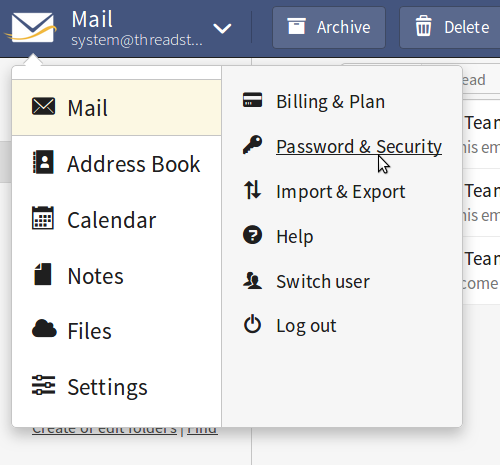
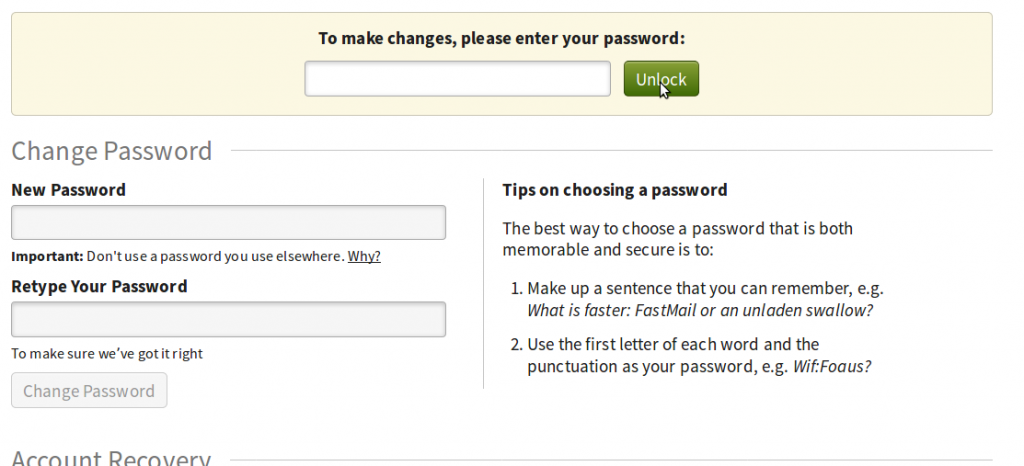
At any rate, I thought I’d make a post in case this helps anybody else. If you can’t get FastMail to work with something like NodeMailer or PHPMailer, or if it suddenly stopped, it could be this. Below are screenshots of the FastMail settings that will solve the problem.

Use the password generated here instead of the regular password in your application, and you’re golden.

Reco: Vagrant

Published / by Andrew

You may remember the post that I had before on using VirtualBox as a testing environment. Well, I recently learned about a program that just blows that out of the water.

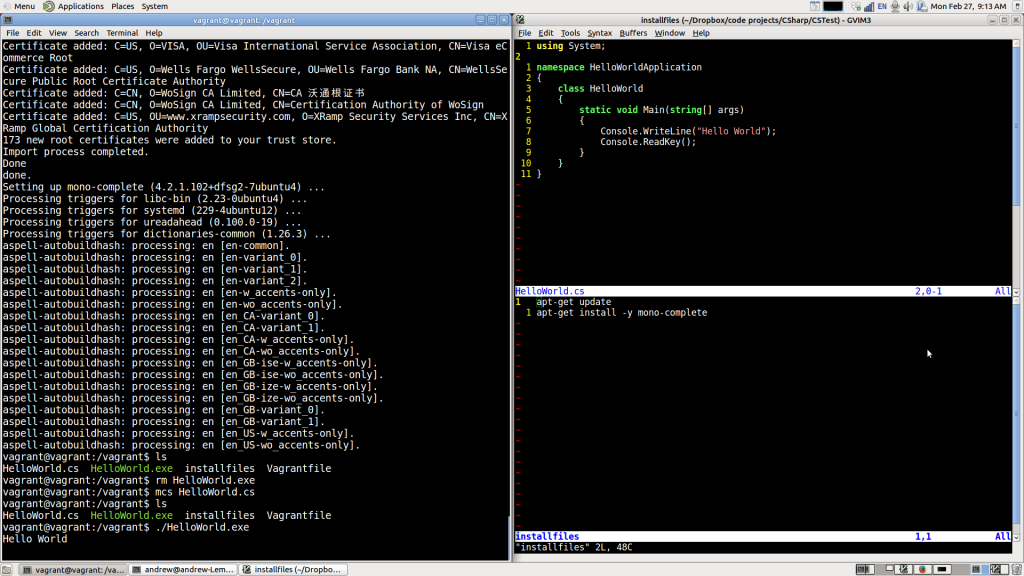
Vagrant makes creating, destroying, using, customizing, ssh-ing into, etc., of virtual machines so ridiculously easy that I’m now using a VM for every project (which is actually the intended purpose of the program). These aren’t just for testing code periodically, but for every step in the development process. I never run the code on the host computer– It’s always in a VM.

That means that I understand all dependencies that are being used. I don’t need to worry that code that works on my machine won’t work on a DO droplet because of an unknown dependency that I installed on my box two years ago. I also don’t need to worry about filling my box with weird and even conflicting software, because the environments are encapsulated in virtual machines. (Case in point– I’m currently teaching myself C#/ASP.Net, etc., and I haven’t bothered to install Mono on my laptop because I’ve installed it in a Vagrant VM instead.)

Vagrant is essentially a program that extends VirtualBox functionality (though it also works with VMware Workstation and Parallels). Everything that I do with Vagrant is possible using VirtualBox on its own, but Vagrant makes it much faster and easier. In Threadstr, I create and destroy VMs on a whim to make sure that every little change that I’ve made to ubuntusetup.sh will work correctly. I rarely even run the node command on the host machine anymore.

Like calculus, Vagrant is hard to learn but easy to use once you’ve learned it. I think it’s well worth the effort, and I’d highly suggest it to any dev that’s working in a compatible project. This means projects that don’t depend on Visual Studio, XCode, or anything else that’s incompatible with Linux, FreeBSD, and other FOSS operating systems. (Piracy laws won’t allow non-free operating systems like Windows, MacOS, etc. to be distributed the way that Vagrant VMs are.)

(If you’re interested in my Vagrant notes, you can find them here, or the original plaintext file here.)